WearKit

Wearkit is an Android Wear implementation of WatchKit.
Download
In your root build.gradle add
repositories {
    maven {
        url  "http://dl.bintray.com/florent37/maven"
    }
}
In your wear module 
compile 'com.github.florent37:wearkit:1.0.0@aar'Usage
StatusBar
You can add a status bar, displaying application name and current time.
In your activity layout, add StatusBarView
<FrameLayout xmlns:android="http://schemas.android.com/apk/res/android"
    android:layout_width="match_parent"
    android:layout_height="match_parent"
    android:background="@color/black">

    <com.github.florent37.wearkit.view.StatusBarView
        android:layout_width="match_parent"
        android:layout_height="wrap_content"/>

</FrameLayout>
The Status Bar Title respond to Activity's title, but you can change it with .setTitle
StatusBarView statusBarView = (StatusBarView) findViewById(R.id.statusBar);
statusBarView.setTitle("MyTitle");
You can set the title color
<com.github.florent37.wearkit.view.StatusBarView
    android:layout_width="match_parent"
    android:layout_height="wrap_content"
app:titleColor="@color/blue"/>statusBarView.setTitleColor(Color.BLUE );You can also add a Back button to the status bar
<com.github.florent37.wearkit.view.StatusBarView
        android:layout_width="match_parent"
        android:layout_height="wrap_content"
        app:backEnabled="true"
/>statusBarView.setBackEnabled(true);
Clicking on the status bar will finish the current Activity
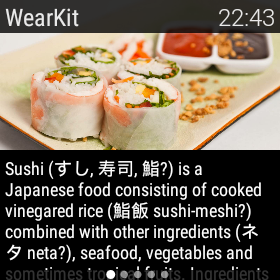
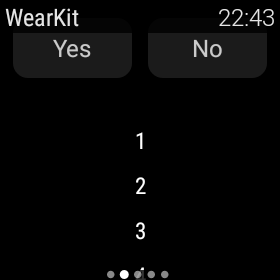
Modal Sheets - Page
In Wearkit, navigation is based on Pagination. The user swipe from right to left to switch from one to another page.
Each page is divided in two sections. The main content, displayed at least on full height of the wear screen ; and the secondary content, displayed below.
To enable Pagination, add a Pager to your activity layout
<FrameLayout xmlns:android="http://schemas.android.com/apk/res/android"
    xmlns:app="http://schemas.android.com/apk/res-auto"
    android:layout_width="match_parent"
    android:layout_height="match_parent"
    android:background="@color/black">

    <com.github.florent37.wearkit.view.Pager
        android:id="@+id/viewPager"
        android:layout_width="match_parent"
        android:layout_height="match_parent"/>

    <com.github.florent37.wearkit.view.StatusBarView
        android:layout_width="match_parent"
        android:layout_height="wrap_content"/>

</FrameLayout>
Then create your pages extending wearkit.Page
public class CustomPage extends Page {
    @Override
    public View onCreatePageContent(LayoutInflater inflater, @Nullable ViewGroup container) {
        return inflater.inflate(R.layout.content2, container, false);
    }

    @Override
    public View onCreatePageSecondaryContent(LayoutInflater inflater, @Nullable ViewGroup container) {
        return inflater.inflate(R.layout.content2_secondary, container, false);
    }
}
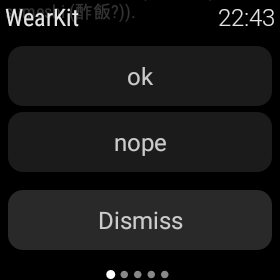
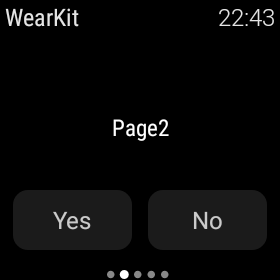
You can also generate a page with secondary options buttons extending wearkit.PageWithActions
public class PageWithImage extends PageWithActions {
    @Override
    public View onCreatePageContent(LayoutInflater inflater, @Nullable ViewGroup container) {
        return inflater.inflate(R.layout.content, container, false);
    }

    @Override
    public Actions onCreatePageActions() {
        return new Actions(
                new String[]{"ok", "nope"},
                true
        );
    }

    @Override
    protected void clickedOnAction(int position) {

    }
}
Actions are constructed with the buttons label. A boolean will enable/disable the dismiss button. (Clicking on the dismiss btn will trigger a scroll to top.)
And add an adapter (based on ViewPager FragmentStatePagerAdapter)
viewPager = (Pager) findViewById(R.id.viewPager);
viewPager.setAdapter(new FragmentStatePagerAdapter(getSupportFragmentManager()) {
            @Override
            public Fragment getItem(final int position) {
                if (position % 2 == 0) {
                    return new PageWithImage();
                } else {
                    return new CustomPage();
                }
            }

            @Override
            public int getCount() {
                return 5;
            }
        });
Contextual menu
You can display a ContextualMenu, accessible by a long press on any page content.
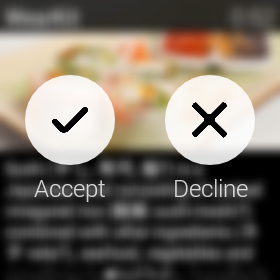
In your activity layout, add ContextualMenu
<FrameLayout xmlns:android="http://schemas.android.com/apk/res/android"
    android:layout_width="match_parent"
    android:layout_height="match_parent"
    android:background="@color/black">

    <com.github.florent37.wearkit.view.Pager
        android:id="@+id/viewPager"
        android:layout_width="match_parent"
        android:layout_height="match_parent"/>

    <com.github.florent37.wearkit.view.StatusBarView
        android:layout_width="match_parent"
        android:layout_height="wrap_content"/>

    <com.github.florent37.wearkit.view.ContextualMenu
        android:id="@+id/menu"
        android:layout_width="match_parent"
        android:layout_height="match_parent"/>

</FrameLayout>
Fill in your code with it (4 entries max)
ContextualMenu contextualMenu = ((ContextualMenu) findViewById(R.id.menu));
contextualMenu.setMenuEntries(new String[]{
                "Accept",
                "Decline"
        }, new Drawable[]{
                getResources().getDrawable(R.drawable.wearkit_menu_accept),
                getResources().getDrawable(R.drawable.wearkit_menu_decline)
        });
And listen to the user interraction
contextualMenu.setOnMenuClickListener(new ContextualMenu.OnMenuClickListener() {
            @Override
            public void onMenuClick(int position) {

            }
        });
Styling
Wearkit come with his styled widgets
Group
<LinearLayout
        android:layout_height="wrap_content"
        android:layout_width="140dp"
        android:orientation="vertical"
        style="@style/wearkit.Group">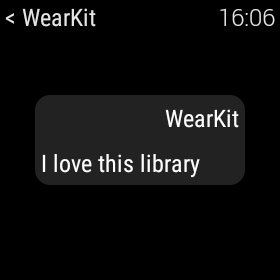
Button
<Button
        android:layout_width="wrap_content"
        android:layout_height="wrap_content"
        style="@style/wearkit.Button"
        android:text="Button" />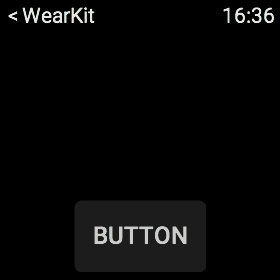
Dependencies
- Using menu logos from http://www.sketchappsources.com/free-source/960-apple-watch-menu-ui-kit-sketch-freebie-resource.html
- ViewPagerIndicator (from Jake Wharton) https://github.com/JakeWharton/Android-ViewPagerIndicator
TODO
- Implement custom scrollbar, with 1/3 screen height
Community
Looking for contributors, feel free to fork !
Wear
If you want to learn wear development : http://tutos-android-france.com/developper-une-application-pour-les-montres-android-wear/.
Credits
Author: Florent Champigny


License
Copyright 2015 florent37, Inc.

Licensed under the Apache License, Version 2.0 (the "License");
you may not use this file except in compliance with the License.
You may obtain a copy of the License at

   http://www.apache.org/licenses/LICENSE-2.0

Unless required by applicable law or agreed to in writing, software
distributed under the License is distributed on an "AS IS" BASIS,
WITHOUT WARRANTIES OR CONDITIONS OF ANY KIND, either express or implied.
See the License for the specific language governing permissions and
limitations under the License.